What is Hardness?
Hardness is the property of a material that enables it to resist plastic deformation, usually by penetration. However, the term hardness may also refer to resistance to bending, scratching, abrasion or cutting.
Measurement of Hardness: Hardness is not an intrinsic material property dictated by precise definitions in terms of fundamental units of mass, length and time. A hardness property value is the result of a defined measurement procedure. Hardness of materials has probably long been assessed by resistance to scratching or cutting.
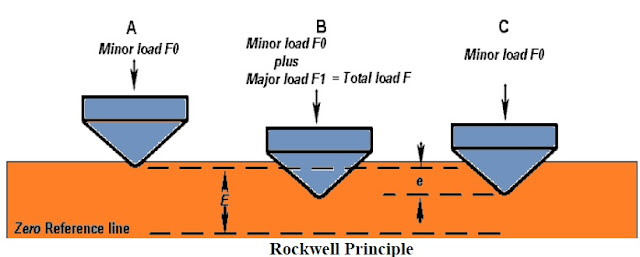
Hardness Test Methods: Rockwell Hardness Test:- The Rockwell hardness test method consists of indenting the test material with a diamond cone or hardened steel ball indenter. The indenter is forced into the test material under a preliminary minor load F0 (A) usually 10 kgf. When equilibrium has been reached, an indicating device, which follows the movements of the indenter and so responds to changes in depth of penetration of the indenter is set to a datum position.
While the preliminary minor load is still applied an additional major load is applied with resulting increase in penetration (B). When equilibrium has again been reach, the additional major load is removed but the preliminary minor load is still maintained. Removal of the additional major load allows a partial recovery, so reducing the depth of penetration (C). The permanent increase in depth of penetration, resulting from the application and removal of the additional major load is used to calculate the Rockwell hardness number.
Rockwell Hardness Test
HR = E – e
F0 = preliminary minor load in kgf
F1 = additional major load in kgf
F = total load in kgf
e = permanent increase in depth of penetration due to major
load F1 measured in units of 0.002 mmE = a constant depending on form of indenter: 100 units for
diamond indenter, 130 units for steel ball indenterHR = Rockwell hardness number
D = diameter of steel ball

Rockwell Hardness Scales
|
Scale |
Indenter |
Minor LoadF0 kgf |
Major LoadF1 kgf |
Total LoadF kgf |
Value of E |
|
A |
Diamond cone |
10 |
50 |
60 |
100 |
|
B |
1/16″ steel ball |
10 |
90 |
100 |
130 |
|
C |
Diamond cone |
10 |
140 |
150 |
100 |
|
D |
Diamond cone |
10 |
90 |
100 |
100 |
|
E |
1/8″ steel ball |
10 |
90 |
100 |
130 |
|
F |
1/16″ steel ball |
10 |
50 |
60 |
130 |
|
G |
1/16″ steel ball |
10 |
140 |
150 |
130 |
|
H |
1/8″ steel ball |
10 |
50 |
60 |
130 |
|
K |
1/8″ steel ball |
10 |
140 |
150 |
130 |
|
L |
1/4″ steel ball |
10 |
50 |
60 |
130 |
|
M |
1/4″ steel ball |
10 |
90 |
100 |
130 |
|
P |
1/4″ steel ball |
10 |
140 |
150 |
130 |
|
R |
1/2″ steel ball |
10 |
50 |
60 |
130 |
|
S |
1/2″ steel ball |
10 |
90 |
100 |
130 |
|
V |
1/2″ steel ball |
10 |
140 |
150 |
130 |
HRA . . . . Cemented carbides, thin steel and shallow case hardened steel
HRB . . . . Copper alloys, soft steels, aluminium alloys, malleable irons, etc
HRC . . . . Steel, hard cast irons, case hardened steel and other materials harder than 100
HRB
HRD . . . . Thin steel and medium case hardened steel and pearlitic malleable iron
HRE . . . . Cast iron, aluminium and magnesium alloys, bearing metals
HRF . . . . Annealed copper alloys, thin soft sheet metals
HRG . . . . Phosphor bronze, beryllium copper, malleable irons HRH . . . . Aluminium, zinc, lead
HRK . . . . }
HRL . . . . }
HRM . . . .} . . . . Soft bearing metals, plastics and other very soft materials HRP . . . . }
HRR . . . . }
HRS . . . . }
HRV . . . . }
Advantages of the Rockwell hardness method include the direct Rockwell hardness number readout and rapid testing time. Disadvantages include many arbitrary non-related scales and possible effects from the specimen support anvil (try putting a cigarette paper under a test block and take note of the effect on the hardness reading! Vickers and Brinell methods don’t suffer from this effect).
2 thoughts on “What is hardness and Rockwell Hardness Test”